

Key Takeaways
Why Air and Moisture Share the Same Entry Points
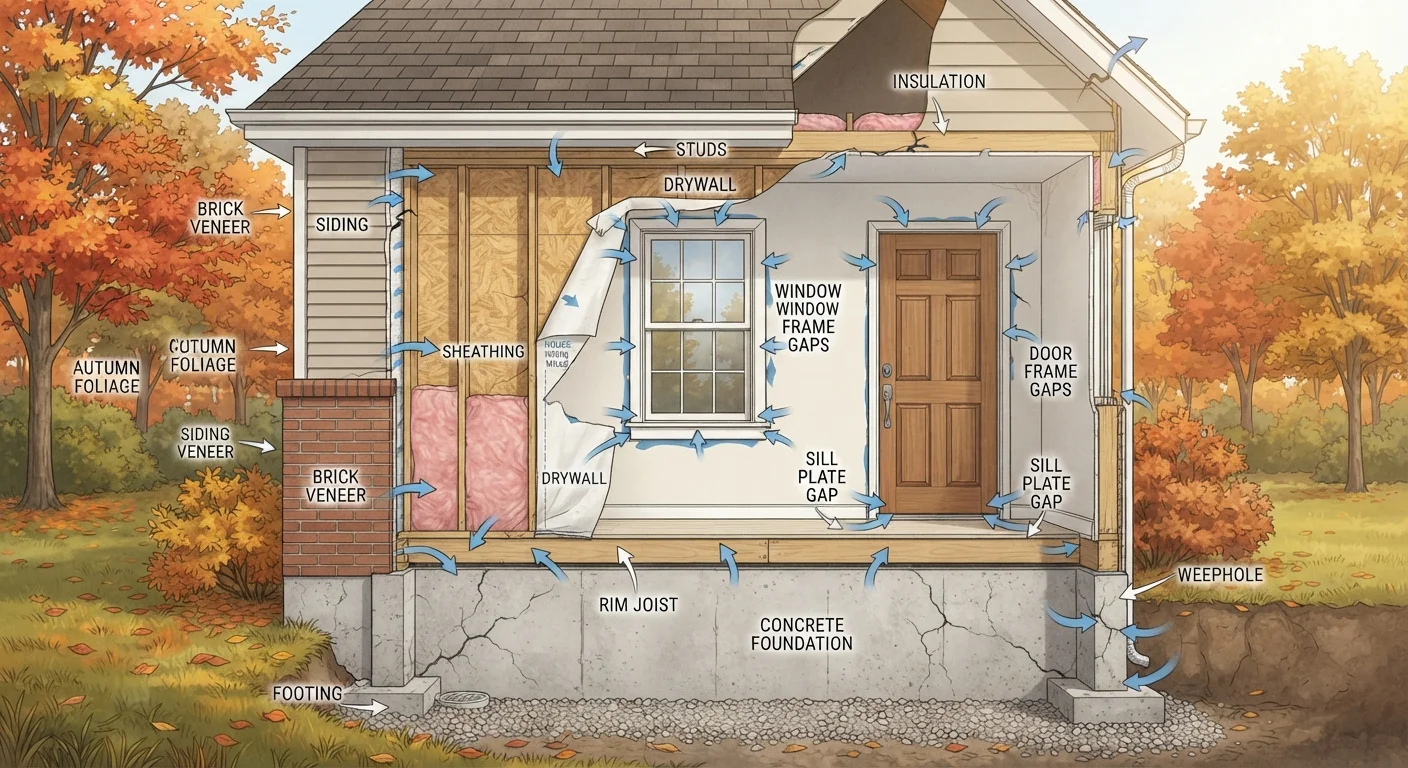
In most homes, air leakage and moisture intrusion aren't separate problems - they're the same problem at the same locations. Wherever outdoor air finds a path inward, it carries humidity in winter (condensation) and moisture-laden heat in summer. Over time, those repeated wet-dry cycles break down insulation, rot framing, and create conditions where mold can take hold.
The Department of Energy estimates that air infiltration accounts for 25 to 40 percent of the energy used for heating and cooling in a typical American home. That's not a problem you can solve by adding insulation alone - in fact, insulating over unsealed gaps traps moisture inside wall cavities. The correct sequence is always: find the gaps, seal them, then insulate. For a full picture of how this fits into your annual home care routine, see our seasonal home maintenance calendar.
The good news is that most leaks cluster at predictable locations. Knowing where to look - before you pick up a flashlight - makes the inspection faster and more thorough.
Use the Incense Stick Test
On a cold, windy day, close all windows and doors, turn off combustion appliances, and run exhaust fans briefly to depressurize the house. Then slowly move a lit incense stick along suspect edges. Smoke that wavers, bends, or gets pulled inward confirms an air leak. This low-cost method catches gaps that a visual inspection misses entirely.
The Most Common Leak Locations
- Window and door frames: Where the frame meets the rough opening in the wall, and where trim boards meet the exterior surface
- Attic bypasses: Top plates, recessed lights, attic hatches, and plumbing chases
- Rim joists: The framing band at the top of the foundation wall
- Utility penetrations: Pipe, wire, duct, and cable entries through walls and floors
- Garage-to-house connections: The shared wall, ceiling, and especially the door between garage and living space
Older homes - generally those built before the 1980s - tend to have more gaps because air sealing wasn't a standard construction practice. But even newer construction develops leaks as framing dries and shrinks, caulk ages, and weatherstripping compresses. Checking these areas isn't a one-time task; it belongs on an annual maintenance schedule.
Don't Seal Before You Test for Radon
Tightening a home's envelope traps indoor air pollutants more effectively alongside the cold air you're blocking. Before undertaking comprehensive air sealing, have your home tested for radon - a colorless, odorless gas that enters through foundation gaps and is the second leading cause of lung cancer in the U.S. Radon testing kits are widely available, and mitigation systems can be installed if levels are elevated. Contact your state's radon program or a certified radon professional for guidance.
What You'll Need Before You Start
Weatherproofing doesn't require specialized trade skills, but having the right materials on hand before you begin prevents half-finished gaps from sitting open overnight. The list of tools and supplies is straightforward, and most are available at any hardware store.
What you will need
Caulk gun with paintable silicone or acrylic-latex caulk
Seals stationary gaps around window frames, door casings, and where siding meets trim.
Foam weatherstripping tape
Cushions and seals the gap between a moving door or window sash and its frame.
Low-expansion spray foam
Fills irregular or oversized gaps around pipes, conduit, and structural penetrations.
Foam backer rod
Fills deep or wide gaps as a backing layer so caulk doesn't sink and fail prematurely.
Utility knife and caulk remover tool
Strips out old, failed caulk so new sealant can bond to clean surfaces.
Incense sticks or thin smoke source
Reveals air movement at suspected leak points through visible smoke drift.
A note on product selection: silicone caulk is more flexible and water-resistant than acrylic-latex, making it the better choice for exterior joints that see temperature swings. Acrylic-latex is easier to paint over and works well for interior gaps. For more on matching insulation materials to specific areas of your home, our insulation types comparison is a useful companion reference.
Step-by-Step: Finding and Sealing the Gaps
Walk the exterior perimeter and mark suspect areas
Start outside on a day when you can feel air movement. Walk slowly around the entire foundation, looking at every place where two different materials meet: where siding meets the foundation, where trim boards butt against brick or stucco, and where exterior pipes or wires enter the wall. Any gap wider than roughly 1/8 inch is a candidate for sealing.
Use painter's tape or a notepad to mark locations - you'll want a clear map before you buy materials. Pay special attention to corners, since framing members in corners often pull away from sheathing as a house settles.
Inspect every door and window from the inside
Move indoors and check each window and door systematically. Look for daylight visible around the frame when the door or window is closed. Run your hand along the perimeter of the closed unit on a cold day - you'll feel temperature differences where air moves.
Check the weatherstripping along door stops and window sashes. Compressed, torn, or missing strips no longer create a seal. Also examine the threshold at the base of exterior doors; a worn door sweep leaves a gap large enough to pass a credit card through - and air passes through even smaller gaps.
Check attic access, recessed lights, and top plates
The attic floor is one of the most significant air leakage zones in any house, yet it's often skipped during routine inspections. Open your attic hatch and look at the hatch frame - most are just a plain wood panel dropped into a hole with no gasket. Cold attic air pours down around it throughout winter.
Inside the attic, shine a flashlight along the top plates where interior walls meet the ceiling. Electricians and plumbers commonly leave gaps where they ran wires and pipes through framing. Recessed light fixtures (especially older, non-airtight models) can leak conditioned air directly into the attic. Seal top-plate gaps with spray foam and, if possible, install airtight covers over recessed lights before adding insulation above them. See our guide to attic ventilation to understand how sealing and ventilation work together.
Locate and seal utility penetrations
Every pipe, wire, cable, and duct that passes through an exterior wall or floor is a potential leak. Check under sinks for the drain and supply lines entering the wall - the holes cut by plumbers are often larger than the pipe itself. The same is true for dryer vents, gas lines, electrical conduit, and HVAC refrigerant lines.
Small gaps around round penetrations are best sealed with low-expansion spray foam. For gaps at the wall behind a sink cabinet, you can fill the opening with foam and then trim it flush once it cures. Avoid using standard high-expansion foam around window and door frames - the pressure can distort the frame and affect operation.
Address the basement and crawl space rim joist
The rim joist is the band of framing lumber that sits on top of your foundation wall and closes off the floor system. It's exposed to outdoor temperatures on the exterior and is rarely insulated or air-sealed properly. In many homes, you can see daylight through the sill area when standing in the basement.
Cut rigid foam board to fit each bay between floor joists and secure it with construction adhesive, then seal the edges with spray foam or caulk. This single improvement can meaningfully reduce drafts on the first floor above. In crawl spaces, also inspect the perimeter where the foundation wall meets the mudsill - another common gap.
Replace or repair weatherstripping and caulk as needed
Once you've identified every leak point, work through them systematically. Strip out any old caulk that has cracked, shrunk, or pulled away from the surface using a utility knife and caulk remover - new caulk won't bond properly over a failed layer. Apply fresh caulk in a steady bead, then smooth it with a wet fingertip before it skins over.
For door weatherstripping, remove the old strip and clean the door stop surface before pressing or nailing the new strip in place. The goal is contact across the full length of the door perimeter when closed, with no compressed dead zones. For more on which product to choose for each application, see our guide on caulk vs. weatherstripping. If you're concerned about caulk longevity, our article on why caulk fails prematurely covers the prep and application mistakes that shorten its lifespan.
After completing all six steps, do a second pass on a cold, windy day to confirm the improvements. Drafts that were obvious before should no longer be detectable by hand. If you notice persistent cold spots on floors near exterior walls, the rim joist area may need additional attention - that single location is often responsible for a disproportionate share of winter heat loss in homes with basements.
Weatherproofing is most effective when paired with appropriate attic and crawl space insulation upgrades. However, be aware that common home maintenance myths sometimes lead homeowners to over-insulate without sealing first, producing diminishing returns. Seal, then insulate - in that order.